Saturday, November 29, 2008

And a few more cards...

1st card: Hi Sweetie card - simple and fun

2nd card: close up as I cut out one candy and attached with pop dot and added Crystal Laquer.

3rd card: Just to bug you card -- also simple and fun

4th card: Card to de's MIL when she was sick. The hummingbird turned out fabulous. Love, love, love this card.

5th card: Close up -- stamped it once on the card front and once on scrap cs. Painted with Radient Pearls then trimmed out and attached with tiny pop dots. Just stunning IRL.


Just a few cards...

1st card: pink ribbon folded over with Cuttlebug hearts dry embossed

2nd card: scrapbook paper, glue pen and fine glitter. Cut out the shapes, added a silver brad for the eye and it's stunning IRL (in real life).

3rd card: Lord Help me saying stamped over Alcohol Inks background. (I love the stamped saying!).

4th card: Close up and side view of the self standing card. I played with this for a bit until I got it to lean how I wanted and then kept a template for the future.

5th card: Quick red card with de's tulip stamp (love it) and red VersaFine ink. Quick, easy, and pretty.


Thursday, November 27, 2008

Happy Thanksgiving

I am so thankful for:

- God and His guidance and assistance in patience and understanding
- My husband for his love, support, friendship, laughter, smiles and hugs
- My daughter who shows me what it's like to see life with 2 1/2 yo eyes
- Our extended families
- A warm loving home
- Our health
- And to live in a country where we can have opportunity and freedom

Below is a Thanksgiving card I had done... I crack up every time I use these stamps together. I hope your day has had many blessings.


Wednesday, November 19, 2008

Good stamping day...

I need to thank my daughter for taking a great nap today... She fell asleep on the sofa, so I carried her up to her room and she's been sleeping for over 2 hours now. I'm getting a lot done! :)

1st card: Cardinal window napkin & some fine glitter... Used spray adhesive & then spray sealer -- worked great, but I must say, the house stinks now. My hubby made a comment as to "why did you go stinkin' up the joint?" I thought for a quick minute (to self) "I hadn't been in the bathroom....." hahahahaha

2nd card: Watermellon napkin & fine glitter with my trusty ol' Mod Podge! (and no stinky.) Thanks a mellon stamped and layered on with foam tape.

3rd card: Grid technique... addicting!

4th card: Mickey mouse head and ears are different circle punches! Used a glue pen around the edges and super fine glitter. "Smile" stamp is a new one to my collection.


Tuesday, November 18, 2008

The storks are flying in...

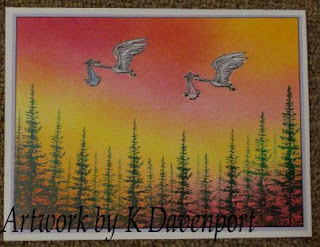
Made another boy/girl twins card -- this one will be from me to my mom's neighbor. I actually had this card front all done on matte cs and then messed it up by wiping off the embossed storks with a damped rag. You can bet I won't do that again!

So, starting all over, this time using glossy (which is what I really wanted to use in the first place), but then this time, I used StazOn black for the storks and then my new Copic markers. Well, those who are really familiar with Copics know you can't use the two together, because the Copic markers will smear the StazOn ink. Yup, learned that tonight too.

Well, a lightbulb went off in my pretty little head and I used the glossy scrap (as it now is scrap paper since I screwed up for the second time) to experiment.

Used my black VersaFine ink to stamp the storks on glossy and the Copic markers ruined that image again. So did my Fine Point Sharpies in a pretty rainbow of colors.

So, Plan c or D or is it even E now... I don't know... I got a new piece of glossy white cs, grabbed my VersaMark ink and inked up the stork and then inked it up with my black StazOn and stamped it. Repeat and stamped again off to the right. Then I grabbed my heat gun and zapped 'em both! Okay, now I'm on a roll. LOL

Colored them in using my H2O pen and directly from the ink pads, colored in the blankets, the babies, the stork's beak, hat and feet. Used a VersaMark pen, colored them and then sprinkled on some clear EP. Zapped them with my heat gun and now nothing would ruin them... (as I hold my breath)...

Using my well loved but lately neglected stipple brushes, I pounced on some yellow, then light pink, then dark pink then orange inks. I grabbed my wonderful StampScapes tree, inked it up in some green StazOn and stamped several times without reinked (1st, 2nd and 3rd generation images). I wiped off the storks -- this time using a DRY rag and wha-la.

Layered and there ya have it.

Finished card is 6 3/4" x 5 1/4"


On a stampin' roll...

Here are some cards I made recently for a friend who commissioned me to create some for her:

1st card: Love this. Acetate, papers, a new little tulip stamp, colored pencils...

2nd card: SU! snow angel -- set is new to me and reminds me of playing in the NJ snow. This could easily be my daughter when she sees snow for the first time.

3rd & 4th cards: Lighthouse is stamped on vellum -- did one w/ ribbon and other w/ brads.

5th card: Happy Wishes is a new stamp for me and stamped on acetate and layered... Love how this came out. Purple is my favorite color of them all.


Back to stampin' !

I am not completely done with cleaning out some files and photos but I did enough that my watermark program now likes me again. LOL I got rid of over 10,000 photos. I love taking pictures -- just don't always burn them to CDs right away. :)

This is one of the cards I was asked to create for my mom's friend. She cracked up when she saw this and said "perfect!" I like when that happens.

I love this image -- frogs are my favorite. After I colored the image using a tile, markers, and my H2O pen, I added Crystal Laquer over the entire martini glass. It's so cool to see and touch.

The olive is stamped twice, cut out the one time and attached with a thin tiny pop dot. I took a few pictures so you could see the details...


Saturday, November 15, 2008

Almost done...

I am almost done cleaning out my files and photos... wow, did I have a lot! I have a ton of cards to upload and share, so check back soon.

We had my MIL and an aunt here for the last few days and it's been wonderful. Hubby had a huge award given to him and we had a three day retreat at a resort at Disney World. It was so nice and I'm so proud of him. And a bonus that our child was wonderful for her grandma. :)

Saturday, November 8, 2008

Computer clean out

I thought I was done last night and so happy but then DH, who is a computer guru< showed me where 17,000 + more photos were stored. OOOOOOOOKay...

So, more computer clean out has happened this morning and more will continue tonight. When my daughter goes down for a nap, so am I. I'm so sleepy...

Friday, November 7, 2008

Cleaning out the computer!

I spent practically all day going thru my files on the computer, burning files onto CDs and then deleting them off the computer. I must have trashed at least 3,000 photos.

My computer was running so slow and it was getting to the point where if I was sure I wouldn't hit hubby's car, I would have tossed the thing out of my upstairs office window!

Let's see how much better it runs tomorrow -- as I plan to defrag it tonight when I go to bed......

Thursday, November 6, 2008

Even more cards

1st card: Flamingo from SU!, saying computer generated

2nd card: all images from Firecracker Designs by Pamela

3rd card: Paisy stamp: Firecracker Designs by Pamela, Saying: Computer generated

4th card: Tree branch: Posh Impressions, Bird: Inkadinkado

5th card: Trees: SU!, Birds: Stampscapes


More cards

All stamps in this post are from Firecracker Designs by Pamela


Wednesday, November 5, 2008

Some more cards from this week

1st card: Angel of the morning: Whipper Snapper Desings

2nd card: bird: Inkadinkado

3rd card: Just a note card -- All stamps by Firecracker Designs by Pamela

4th card: Indian Summer card -- All stamps by Firecracker Designs by Pamela


Cards created the past week

All stamps in this post are from Firecracker Designs by Pamela.

Note on the butterfly card: Stamped the butterflies on transparency sheet, cut out, added glue using a fine tipped glue pen and ultra fine glitter. Bent up the wings, added Elmer's glue to the body, and adhered to my cardfront. So pretty IRL.


Halloween photos

Our sweetness had a great time being Aurora (aka: Sleeping Beauty). But no sleeping on Halloween night! We went up and down our main road and then came back to the house to get her stroller. Then her and I went down the other side of our street, around the corner, and went to a bunch of houses there and then home.

She got such a haul! When I asked if she would share with Mommy and Daddy, she replied "of course!" What a sweet child. :)

When it came time for her to go to bed, we had our one story as usual and then lights out. I go in my office, which is across the hall from her bedroom and she usually carries on for 15 minutes before she settles down and falls asleep. Halloween night, her head hit the pillow and she was out cold by the time I walked into my office. Nice...


Tuesday, November 4, 2008

New to the blog thing...

Now that the blog is set up (finally), I need to learn how to do all the blog stuff that goes with it. LOL


Check back soon. :)