I got back in... so much has changed! I’ll have to try and get this going again... or start a new one. Stay tuned...
.JPG)
A place where I can show showcase my art - whether it's a card, a craft, a trash-to-treasure redo, or brag a little bit about my family. I hope you enjoy...
Thursday, May 21, 2020
Wednesday, July 8, 2015
Concrete Creations (and not just stepping stones!)
Cost: Will vary depending on what you want to use.
Time: Each peice needs at least 24 hours to dry.
Task: EASY
PLEASE READ THESE SIX TIPS BEFORE STARTING....
1. This is an outdoor only project!!! DO NOT use your indoor sinks/plumbing for this project either before, during, or after. Use an outdoor water source because you do not want to have a concrete dry and clog up your plumbing inside your home. Reread #1.
2. Wear old clothes! The oil will splatter for sure, no matter how careful you are. Trust me.
3. Read warnings on your cement bag. They may suggest using a mask because of the dust. (I grabbed a mask at my last doctors appointment but they do sell them at Home Depot and the like.)
4. The cement bag may also suggest you wear gloves (Grab a few at your next doctor appointment or they do sell these at the dollar stores, Walmart, Home Depot, etc.)
5. Remove all rings and bracelets due to the cement that could scratch your jewelry and the oil... It would be bad if your ring slipped off into a concrete stepping stone and you didn't realize it until it's too late.
6. Moisture is NOT your bag o' concrete's friend. Get some friends to create with you or make sure you have several items to serve as molds and use up the concrete within a week or so. Store in cool, dry place. I was able to make many projects with one 80 pound bag of concrete… And only had one project failure that was the size of a small coffee can.
From one bag, I made:
9 square stepping stones,
3 round stepping stones,
4 small butterfly bowls,
1 long brick stepping stone,
1 tall vase,
2 shorter vases,
1 block watering bowl...
______________________
Wednesday, July 1, 2015
So there was this challenge.....
My Little Pony Get Well card
Bethany, my 9yo daughter, used a paint program on the laptop and looking at a picture of the My Little Pony picture, she drew this one and then printed it out on cardstock. We made it into a Get Well card for her sweet friend.
Father's Day Trout Painting
Stampscapes Card for FIL
I love, love, love making Stampscape cards!! This birthday card went out to my Father In Law who loves to fish.


Goldie sympathy card
I hate making sympathy cards... So sad. This one is for our neighbor who's sweet dog, Goldie, passed away unexpectedly.
In-Laws Anniversary Birdie
Anniversary card for my Mother In Law and Father In Law. The bird is adhered on the bottom and tail with thin pop dots and the top of the bird is adhered with just double stick tape. Colored images with Pearl Ex paints (Haven't used those in a long, long time!) And some Crystal Laquer over the berries.
Big Birthday Balloon Dog
I have been busy creating... just not posting. I'm trying to redo this blog but I'm not "that" blog savy. I do plan to reach out to a dear friend who is and hope she can help me. Until then, let me get busy posting some cards I've made recently. :)
Birthday card for a friend's daughter who loves dogs.
Thursday, January 1, 2015
The first day of 2015
January 1, 2015... Here's to a year of getting organized, donating what we don't need, and having a place for everything. Happy New Year.
So much has happened. In July 2013, we sold our home and rushed to pack and move up to the north GA mountains. October 2013, my stepmom passed away after a crazy 7 weeks of illness, life support, getting better, then taking a turn for the worse. November 2013, we moved again into our forever home. In May 2014, my dad died. Such sadness. Such craziness. Stamping, creating has taken a back seat to life. But now that we are mostly settled into our new home, I want to create. I want to stamp. I want to continue living life to the fullest.
Tuesday, May 14, 2013
Mickey & Minnie Thank You
A thank you card from my daughter and me.... Her Mimi took her for an overnight stay at Disney's animal Kingdom Lodge and then a day at the Magic Kingdom to celebrate my daughter's 7th birthday. From the pictures, their "apartment" was amazing and there's never a bad day at the Mickey's house!


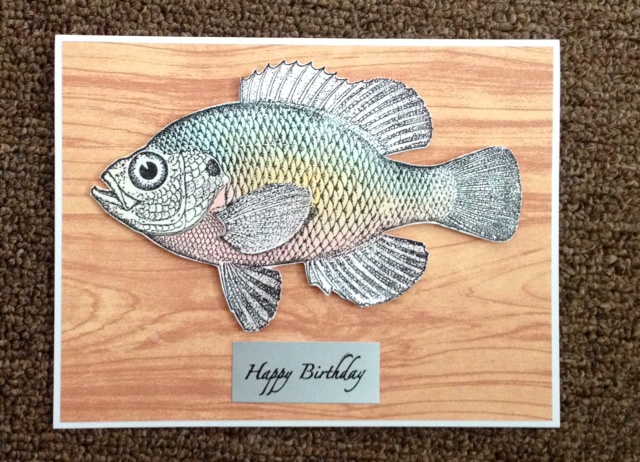
The one that didn't get away....
This is a big fish! I mounted him on paper that has the wood grain look. Colored him with Radiant Pearls (I haven't used them in forever and forgot how much I love them.)
Stamped the sentiment on silver glossy to look like it's a plaque. :)


Thursday, May 2, 2013
Faux tearing
Got out the stipple brushes and after putting some torn painters tape onto card stock, just stippled quickly and stamped images. Quick but great look.
Thanks to my cat sitter
This card was so much fun to create.
I stamped the cat and colored with pencils and Gamsol. I then took a dry embossing tool and on the back, made little circles all over to puff it out. The picture frame was carefully cut and added a sheet of accetate to make it look like a real glass window. The trees in the background were stamped anc colored before assembling the rest of the card. He totally got a kick out of this card
!
!

Thank you 3-D flowers
Sent this 3-D flower beauty out to a dear friend for my thank you gift. I love curling up the flower petals to make them three dimensional.


Two special cards
Lis recently fell and broke her leg. She had to have surgery and rehab. This is a new stamp set I recently purchased. Colored with pencils and added Stickles for glitter.


This lady is chillin' out for Rita's birthday.... :)


This lady is chillin' out for Rita's birthday.... :)

Tuesday, February 26, 2013
T2T Bedside Table now Cat Bed
I was driving home after dropping my daughter off at school and saw this and some other items at the end of this person's driveway. It turns out, his family was moving and couldn't take some things.... So he didn't mind if I did.
The top drawer is broken and missing a knob.
 Rmoved the drawers...

 Also removed the bars that the drawers were sitting on...
 This is the top drawer that I took apart. I want to keep the front panel as I love the curves and will reuse it to hold the pillow in.
 Sanded it down....
 Everything is now sanded down.... And added a bottom piece of scrap wood. I purposely left gaps on each side for ventilation.
 I painted it with 3 coats of black and then 3 coats of lacquer.
 I took an old bed pillow, cut it open, removed some filling, sewed it back up and used a pillow case but sewed it to be a little smaller -- making it more snug of a fit.
 The top view...
 Close up of inside... I hope my cat likes it.

 The pillow getting its makeover...

 Total cost: $3 in spray paint and $2.50 for using half of the can of lacquer... It was fun to create and repurpose this.
Subscribe to:
Posts (Atom)